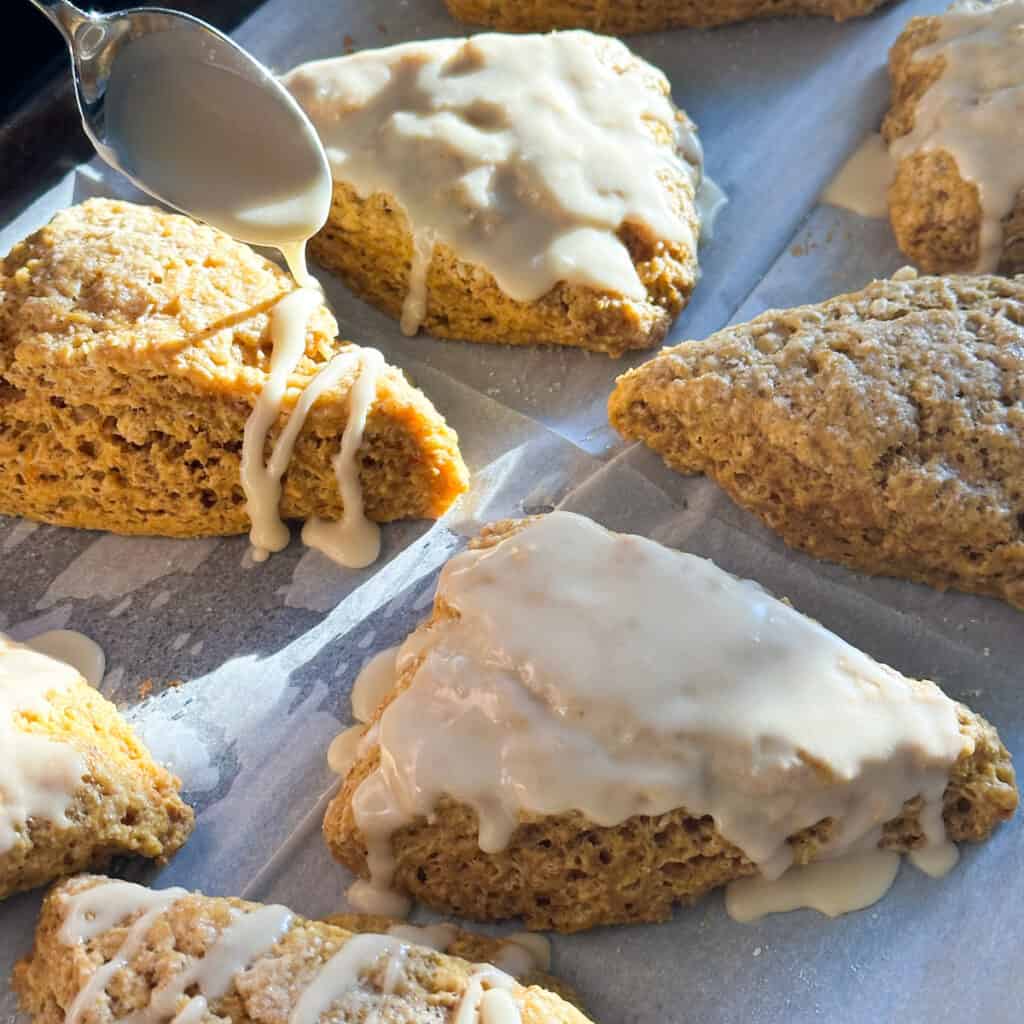
Sourdough Pumpkin Scones
My sourdough pumpkin scones are a delicious fall treat that uses up your extra sourdough starter discard. I love this recipe because these scones have a rich pumpkin flavor packaged in beautiful triangle-shaped pastries that have a soft yet flaky texture. Scones are known for having a light yet rich texture due to the substantial rise they get from the leavening agents coupled with butter and heavy cream. To finish these scones, we top it with my favorite maple glaze recipe.
I absolutely love the fall season and admittedly, pumpkin spice flavored treats. Some of my favorite creations include my sourdough pumpkin bread, pumpkin sourdough chocolate chip cookies, and my maple pumpkin sourdough muffins. This recipe might be my new favorite though! I added just a hint of orange flavor to complement and brighten the spices and pumpkin flavor. You are going to love this recipe.

Ingredients:
Flour: Use regular all-purpose flour for this recipe. I do not recommend substituting whole wheat flour in this recipe or you will end up with tough and dry scones.
Spices: We use a combination of pumpkin pie spice and cinnamon in this recipe to supplement. I like adding extra cinnamon in addition to the pumpkin pie spice. The cinnamon adds extra flavor without adding too much of the strong clove or nutmeg flavors.
Salt: You can use either sea salt or regular table salt for this recipe.
Baking Soda and Baking Powder: I use both baking soda and baking powder in this recipe. The combination provides a good rise plus a browning effect from the baking soda.
Butter: Butter is arguably the most important ingredient in scones. You want this butter to be COLD. This ensures you have chunks of butter that get distributed throughout the dough. The butter pieces are necessary to create the flaky layers scones are known for. If you can remember to put the butter in the freezer ahead of time, I highly recommend it. Regular unsalted butter is best but you can also substitute salted butter
Brown Sugar: Brown sugar provides extra moisture and enhances the flavor of the pumpkin pie spices.
Pumpkin: Use pure pumpkin puree, not pumpkin pie filling. Pumpkin pie filling contains other ingredients like sugar and spices that we don’t need in this recipe.
You can either purchase canned pumpkin puree or make your own homemade pumpkin puree.
Egg: Traditional scones do not typically contain eggs, but I tested this recipe both ways and I loved the results with the egg (although they were still good without it). This recipe uses the egg yolk and egg white separately. The egg yolk adds richness and moisture to the scone batter without making it to wet. The egg white is used for an egg wash on top of the scones before baking the scones, which results in a beautiful shiny appearance once baked.
Milk: Many scone recipes call for heavy cream, but I didn’t have any on hand. The results were still great with whole milk. If you prefer you can use heavy cream in this recipe.
Vanilla: I recommend pure vanilla extract rather than imitation vanilla.
Sourdough Discard: The main purpose of sourdough discard recipes is to use your extra sourdough discard, rather than throwing it away. The discard also creates a slightly tangy flavor in baked goods that many people love! You can use either active sourdough starter or unfed sourdough discard in this recipe. Because this is considered a quick bread, an active starter won’t leaven the scones at all.
Orange: This is optional but I HIGHLY recommend it. The orange zest adds just a hint of flavor to the the scones. I also added a bit of orange juice to the glaze, along with maple syrup, to create a delicious variation of my favorite lemon glaze that I use for my zucchini muffins. In my first go with testing this recipe, I did not add any orange. The results were good but once I added the orange, it really took these scones to the next level.

How to Make
Step 1: Start by grating the very cold butter with the large holes of a cheese grater or box grater over a large plate. To do this, unwrap the butter and hold the stick with the paper. Try to work very fast through this step so the butter does not melt. If the butter starts to melt where you are holding it, turn the stick around in the paper and alternate the sides that you grate. Once you have completed this step, put the grated butter into the freezer while you make the rest of the recipe.


Step 2: Whisk together the dry ingredients in a medium bowl.
Step 3: In a large bowl, whisk together the dry ingredients plus the brown sugar. Add the grated butter and work it into the flour using your hands until all the butter is coated and crumbly.


Step 4: Pour the wet ingredients over the dry ingredients and begin to mix it with a wooden spoon or rubber spatula until it forms a shaggy dough and the flour mixture is fully incorporated into the sticky dough.


Step 5: Turn the dough onto a lightly floured surface and knead it 4-5 times until it holds together.
Step 6: Shape the dough into a 9-inch disc and use a sharp knife or bench scraper to cut the scones into 8 pie-shaped pieces.


Step 7: Place on a large prepared baking sheet lined with parchment paper and brush with the egg white. Sprinkle with sugar.
Step 8: Bake at 400F for 12-14 minutes. The scones should appear fully cooked without any wet dough in the center layers. They should also have slightly golden brown edges. Allow to cool completely on a wire rack before add the maple glaze.
Step 9: Whisk together all the glaze ingredients. Pour over each scone.
How to Store
These delicious scones are best if consumed in the first 1-2 days after baking. Store them at room temperature on a plate covered with plastic wrap, or in an airtight container. Avoid stacking them on top of each other, or the glaze with transfer and get smeared.
If you cannot consume them all within 3 days, I recommend storing them in the refrigerator for up to 5-7 days.
How to Freeze Sourdough Discard Pumpkin Scones
If you want to make these ahead, simply make the scone dough ahead of time and cut them into individual scones. Freeze them on a baking sheet, separated from each other, then place them in a plastic freezer bag. When you are ready to bake them, do not thaw, simply add 3-5 minutes to the bake time until done. Make the glaze the day you bake them. I recommend baking the frozen scones within 3 months for best results.

Variations and Substitutions
You can make several substitutions and variations in this recipe:
- Add 1/2 cup chopped nuts or chocolate chips. If you choose to include these ingredients, mix them in with the dry ingredients before adding the wet ingredients.
- Leave out the orange and use milk instead of orange juice in the glaze.
- Use honey instead of maple syrup in the glaze.
Can You Make Scones in the Food Processor?
I have never tried making these scones in a food processor but this is a common technique for making scones. If you choose to do so, be sure not to over-process the dough. You still want to make sure you have chunks of butter, which makes these scones ultra flaky. You can also use a pastry cutter (sometimes called a pastry blender) to cut the butter into the batter, but I find that this results in more inconsistent results and prefer the grater method.
I hope you enjoyed these sourdough pumpkin spice scones. I have several other sourdough scone recipes in the works so stay tuned! I you want to make sure you never miss a recipe, I encourage you to sign up for my email list. I promise I won’t spam you!

Sourdough Pumpkin Scones
Equipment
- 1 large mixing bowl
- 1 Medium Mixing Bowl
- Measuring cups and spoons
- 1 bench scraper or sharp knife
- 1 Large Baking Sheet
- 1 box grater
Ingredients
- ½ cup cold, unsalted butter
- 2 cups all purpose flour
- ⅓ cup brown sugar, packed
- ½ teaspoon salt
- ½ teaspoon baking soda
- 1 teaspoon baking powder
- 2 teaspoons pumpkin pie spice
- ½ teaspoon ground cinnamon
- ⅓ cup sourdough discard
- ½ cup pumpkin puree
- ⅓ cup whole milk
- 1 egg yolk
- 1 teaspoon pure vanilla extract
- ½ teaspoon orange zest (optional)
For the Egg Wash
- 1 egg white
- 1 tablespoon granulated sugar
For the Glaze
- 1 tablespoon melted butter
- 1 tablespoon fresh squeezed orange juice (or whole milk)
- 1 tablespoon maple syrup
- ½ cup powdered sugar
Instructions
- Preheat oven to 400℉
- Unwrap half of the butter stick and grate the cold butter with the large holes of a cheese grater or box grater over a large plate. Place in freezer while you prepare the rest of the ingredients.
- In a medium mixing bowl, whisk together the pumpkin puree, milk, vanilla, orange zest and sourdough discard until smooth.
- In a large bowl, whisk together the dry ingredients plus the brown sugar. Add the grated butter and work it into the flour using your hands until all the butter is coated and crumbly.
- Pour the wet ingredients over the dry ingredients and begin to mix it with a wooden spoon or rubber spatula until it forms a shaggy dough and the flour mixture is fully incorporated into the sticky dough.
- Turn the dough onto a lightly floured surface and knead it 4-5 times until it holds together.
- Shape the dough into a 9-inch disc and use a sharp knife or bench scraper to cut the scones into 8 wedge-shaped pieces.
- Place scones on a large baking sheet lined with parchment paper and brush with egg wash. Then sprinkle the sugar over the scones.
- Bake for 12-14 minutes. The scones should appear fully cooked without any wet dough in the center layers.
- Allow to cool completely.
For the Glaze
- Whisk together the melted butter, orange juice, maple syrup, and powdered sugar until the mixture is smooth and thick. Drizzle over each scone and allow to set before serving.


2 Comments