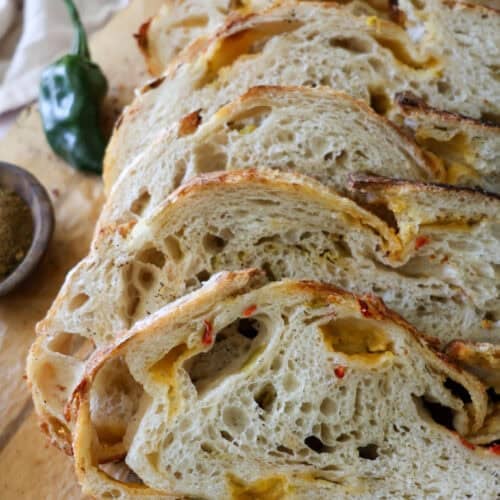
Green Chile Cheddar Sourdough Bread
This green chile cheddar sourdough bread is the perfect spicy sourdough bread recipe. This delicious savory bread is filled fresh roasted Hatch green chile and chunks of cheddar cheese throughout. It's sure to be a favorite amongst your sourdough inclusion loaves.
Ingredients
- 500 g bread flour
- 340 g water
- 100 g sourdough starter
- 10 g salt
- 4 oz Hatch green chile
- 4 oz cheddar cheese cut into ⅓ inch pieces
- chile powder optional for dusting bread before baking
Instructions
Make the Levain
- The night before baking, combine 25 g of starter with 50 g of water and 50 g of flour. Allow to rise overnight. In the morning, your starter should have at least doubled.
Make the Dough
- Use a bread whisk or your hands to mix the flour, water, and starter in a large mixing bowl. Mix until the dough comes together and forms a shaggy dough. Cover and let rest for 1 hour.
- Wearing gloves, add half of the cheddar cheese and chile, along with the salt to the dough. Perform a set of stretch and folds. Cover and let rest for 15 minutes.
- Add the second half of the cheese and green chile to the dough. Perform an additional set of stretch and folds to mix as much of the green chile and cheddar into the dough as you can.
- Perform 2-3 more sets of stretch and folds every 15 minutes. By the end of your last set of stretch and folds, the green chile and cheese should be mixed into the dough. Cover the bowl and allow to rest at room temperature for the remainder of the bulk fermentation.
- Once bulk fermentation is complete, shape the dough. Gently spread the dough on a lightly floured work surface in an approximate square shape the proceed with the following instructions based on the desired shape of your bread:To make a boule: Fold the dough into thirds, the roll the dough into a cylinder. Turn the dough seam side down onto your work surface. Gently pull and twist the dough towards you 1-2 times to form a ball. **Be careful not to do this too many times or the dough will start to rip and the green chile and cheese will spill out. Inclusion loaves should be shaped gently and handled delicately. To make a batard: Fold the dough into thirds, then roll the dough up into a cylinder. Pinch the ends gently. Transfer to a lightly floured banneton.
- Cover the banneton with plastic wrap. Place in the refrigerator for 12-24 hours for cold fermentation. NOTE: You can skip cold fermentation if you want to make it the same day and bake immediately or after a short cold fermentation of a few hours.
Bake the Bread
- Place a 5 quart or larger dutch oven in your oven. Preheat the oven to 450℉. Once the oven is preheated, score your bread. Make a large cut from one end of the dough to the other. Use the parchment paper to carefully lift the bread and place it into the preheated dutch oven. Cover with lid, and bake for 25 minutes with the lid on. Remove the lid and bake an additional 20 minutes with the lid off.
- Once the oven is preheated, remove the dough from the fridge and turn in onto a piece of parchment paper, seam side down. Use a sharp knife or a bread lame to make a single score down the center of the bread for a batard, or in an X pattern across the bread for a boule.
- Remove the preheated dutch oven from the oven. Use the parchment paper to lift the bread and carefully transfer it into the dutch oven. Cover with the lid, and place in the oven.
- Bake, covered, for 25 minutes. Then, remove the lid and reduce the temperature to 425℉. Bake for an additional 20 minutes. NOTE: To prevent the bottom of the bread from developing a thick tough crust, you can remove the bread from the dutch oven halfway through the bake (when you uncover the bread). Place a trivet on the bottom of the dutch oven, then use the parchment paper to place the bread on top of the trivet. This creates space between the bottom of the bread and the hot dutch oven for the remainder of the bake.
- When finished baking, use the parchment paper to carefully remove the bread from the oven and transfer to a wire cooling rack.
- For best results, allow to cool for about 2 hours before slicing into it.
Tried this recipe?Let us know how it was!